
From February 2024, Gmail is set to undergo a transformation that could shake up the way we approach email communication.
These changes are primarily aimed at battling the constant nuisance of spam and ensuring a safer, more streamlined experience for users.
So, let’s check these Gmail changes from February.
Gmail’s new anti-spam regulations:
To ensure Gmail inboxes stay secure and reliable, Google is rolling out new rules for certain email senders. Starting February 2024, these senders must meet specific criteria for their emails to be delivered successfully.
Secure Email Authentication: Make sure your emails are extra secure by using specific safety measures called SPF, DKIM, and DMARC. This helps check that the emails are really from you and not fake.
Simple Unsubscribe Option: Put a simple button in every email so that people can easily choose not to get more emails from you. This gives them control over what they receive.
Swift Unsubscribe Handling: If someone decides to stop getting emails from you, you need to process their request fast—within two days. This shows you respect their choice.
Minimal Spam Complaints: Keep the number of complaints about your emails very low—only 0.3%. This means people find your emails helpful and don’t mark them as annoying.
Who will be affected by Gmail changes from February?
The Gmail changes from February are set to affect all email senders who do not adhere to the specified guidelines. However, the impact will be particularly stringent on those who send a considerable volume of emails, reaching 5000 or more per day.
Everyone has to follow the main rules, but if you send lots of emails, like 5000 or more every day, you’ll need to follow even more specific and detailed rules outlined in this post further.
Failure to comply with these regulations could result in a higher likelihood of their emails being marked as spam or rejected by Gmail’s filters, ultimately impacting their ability to reach the intended audience.
How to stay safe from Gmail 2024 update?
If you want to stay safe from this update make sure you follow the rules mentioned below.
For All Senders
Email Authentication
Set up SPF or DKIM for your domain. These are methods that prove your emails are genuine and not forged. SPF (Sender Policy Framework) verifies the sender’s identity by checking the email against a list of authorized sending mail servers for that domain. DKIM (DomainKeys Identified Mail) adds a digital signature to emails, ensuring they haven’t been tampered with during transit.
Steps to set up SPF
1. Figure out and enlist the places (servers) that are allowed to send emails on your behalf. It could be your website’s hosting service, an email marketing tool, or your email provider.
2. Write down their details, like their IP addresses or domain names. This information helps tell email systems, like Gmail, that these servers are allowed to send emails for your domain.
3. Create an SPF Record: In your website or domain settings, there’s a place called DNS settings or something similar. Look for where you can add a TXT record and create an SPF record.
4. In that TXT record, write something like a rule book for your approved senders. It starts with “v=spf1” and then includes the IP addresses or domains of your email servers.
For example: v=spf1 ip4:192.168.1.1 include:_spf.example.com ~all (this indicates that all servers all allowed to send email for you)
Replace “_spf.yourdomain.com” with the actual mail server or service you use to send emails.
5. Go to your website settings (usually in your hosting account), find the section for DNS settings, and paste this record there.
6. Check it’s Set Right.
7. Whenever you change or add email servers, update your SPF record. This way, your email system always knows who’s allowed to send emails for you.
Steps to DKIM
1. Access DNS Settings: Log in to your domain hosting provider or DNS management console where you control your domain’s DNS settings.
2. Generate DKIM Keys: Most email service providers (ESPs) have a section in their settings or control panel to generate DKIM keys. Look for the DKIM setup or authentication settings within your email service provider’s dashboard.
3. Generate the DKIM Record: Once you find the DKIM setup section, generate a DKIM key pair. This includes a public key (which will be added to your DNS records) and a private key (which remains within your email server).
You can use a DKIM record generator to do do.

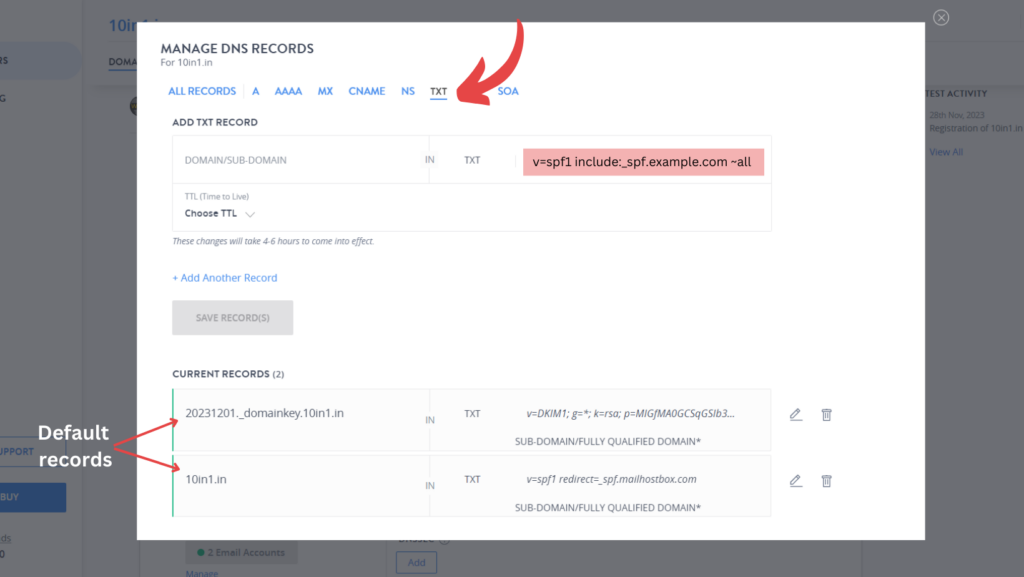
4. Add DKIM Record to DNS: After generating the DKIM key pair, you’ll receive a DKIM record that looks like a long string of text. This record needs to be added as a TXT record in your domain’s DNS settings. To do so:
- Log in to your DNS management interface.
- Create a new TXT record and use the selector and domain provided by your email service along with the DKIM key generated.
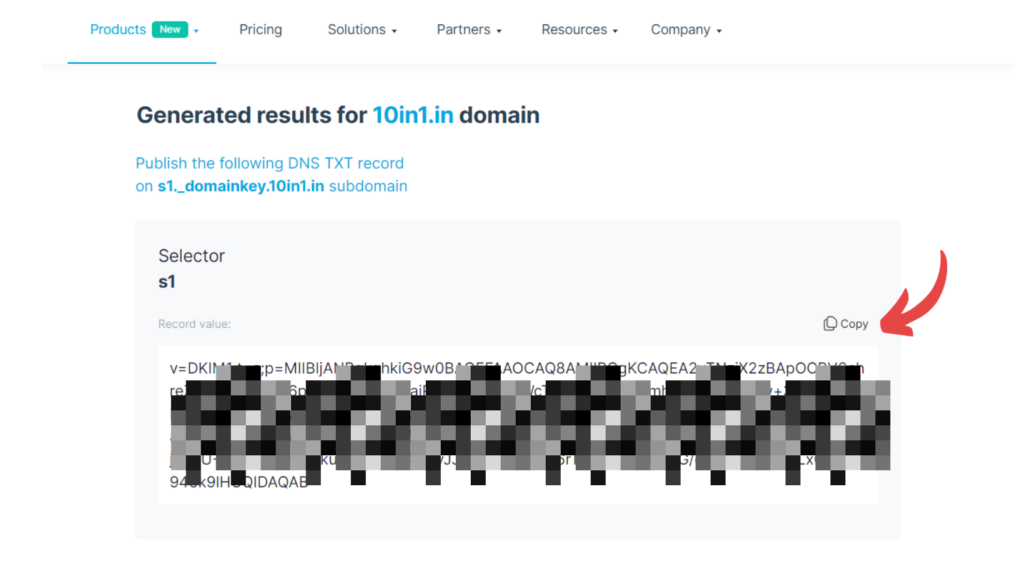
- It should look something like this: selector._domainkey.yourdomain.com IN TXT “v=DKIM1; k=rsa; p=MIGfMA0GCSqGSIb3DQEBAQUAA4GNADCBiQKBgQD… (your DKIM key)”
- Replace “selector” and “yourdomain.com” with your specific values provided by your email service provider.
Here’s how it looks for our domain.
5. Publish the Record.
6. Save the changes to your DNS settings to publish the DKIM record. It may take some time (up to 48 hours) for the changes to propagate across DNS servers.
Domain Records
Make sure the domains or IPs you’re using to send emails have the right DNS records. DNS (Domain Name System) records, like PTR (Pointer) records, confirm that your sending domain is authentic and not a spoof or fraudulent address.
Manage Spam Rates
Keep a close watch on your spam rates using Postmaster Tools. A spam rate below 0.3% indicates that your emails are well-received and trusted by recipients. This helps maintain a positive sender reputation and ensures your emails land in the inbox rather than spam folders.
We would suggest you to keep your spam rate as low as 0.1%.
Email Format Standards
Follow the Internet Message Format standard (RFC 5322) when structuring your emails. This standard defines the format of emails, including headers, message bodies, and attachments. Adhering to this standard ensures your emails are correctly formatted and easily readable by different email clients.
Avoid Gmail Impersonation
Never pretend to be Gmail in the “From” section of your emails. Gmail is implementing strict policies against impersonation to protect users from phishing attacks and ensure trust in the platform.
Forwarding Emails
When forwarding emails through lists or gateways, add ARC headers to indicate that the message has been forwarded. Additionally, use List-id: headers for mailing lists to specify the group the message is sent to. These measures help in tracking forwarded emails and identifying the original sender.
For Bulk Senders (5000 or more messages per day)
Enhanced Authentication
Bulk senders must have both SPF and DKIM authentication configured for their domains. Follow the steps mentioned above to set up your SPF and DKIM.
This provides an added layer of security by ensuring the legitimacy of emails sent in bulk.
Maintain Standards
Bulk senders need to uphold the same standards as all senders, including proper formatting, avoiding impersonation, and handling forwarded emails effectively, as mentioned earlier.
DMARC Setup
Implement DMARC email authentication with an enforcement policy (even if set to none) for your sending domain. DMARC (Domain-based Message Authentication, Reporting, and Conformance) helps align authentication mechanisms (like SPF and DKIM) and protects against email spoofing and phishing.
Steps to implement DMARC email authentication
DMARC relies on SPF and DKIM to authenticate emails and specifies how receivers should handle emails that fail authentication.
So before setting it up, ensure that your domain has correctly configured SPF (Sender Policy Framework) and DKIM (DomainKeys Identified Mail) records. DMARC works alongside these protocols to enhance email security. Then:
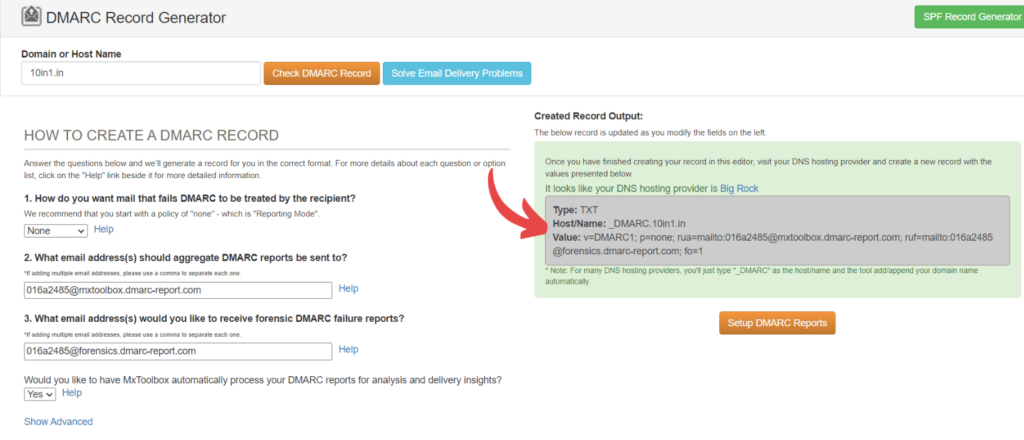
1. Log in to your DNS management dashboard or domain registrar’s website to create a DMARC TXT record. The DMARC record includes policies for handling emails that don’t pass SPF or DKIM authentication.
The basic syntax for a DMARC record looks like:
_dmarc.yourdomain.com. IN TXT “v=DMARC1; p=none; rua=mailto:your@email.com; ruf=mailto:your@email.com; fo=1;”
Replace “yourdomain.com” with your actual domain and adjust the policies according to your needs.
- v=DMARC1: Indicates the version of DMARC being used.
- p=none: Starts with a relaxed policy for monitoring without affecting email delivery. It instructs receivers to report on emails that fail authentication but not to block or quarantine them.
- rua: Specifies the email address to receive aggregate reports (summary reports of authentication results).
- ruf: Specifies the email address to receive forensic reports (detailed individual message reports).
You can also use a DMARC record generator to generate a record
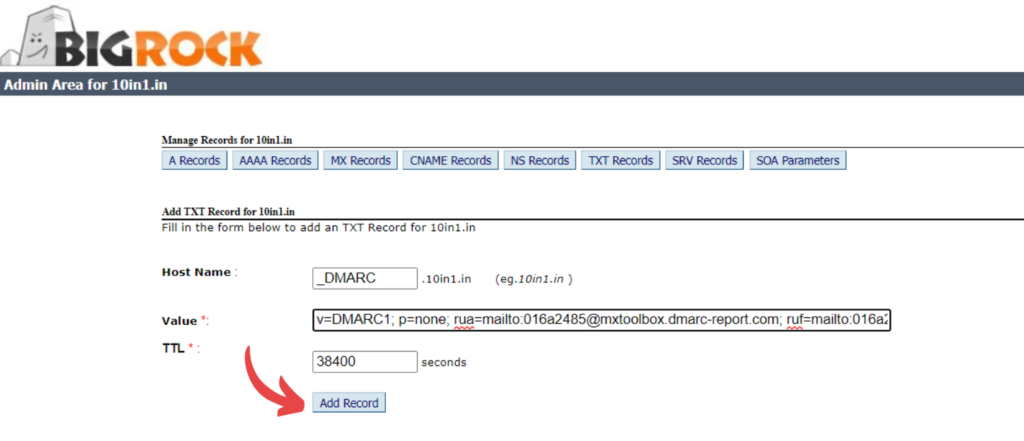
2. Add the DMARC TXT record to your DNS settings by following the instructions provided by your DNS host or domain registrar. Save the changes to publish the DMARC record.
In BigRock, it will look something like this.
3. Once the DMARC record is published, monitor the reports sent by email receivers. These reports provide insights into how your emails are being authenticated and whether any unauthorized activity is detected.
4. Over time, adjust the DMARC policy (p= tag) to “quarantine” or “reject” mode once you’re confident that your legitimate emails pass SPF and DKIM checks consistently.
Sender’s From
Header Alignment: Ensure that the domain specified in the sender’s From: header matches either the SPF domain or the DKIM domain. This alignment is crucial for DMARC compliance and ensuring emails are genuine and not tampered with.
Marketing and Subscribed Messages
Provide an easy one-click unsubscribe option and ensure the unsubscribe link is prominently visible within the message body. This practice complies with regulations and ensures recipients can easily opt out of receiving further communications.
Other measures and essential tips
Here are a few more practical tips to help you navigate the Gmail changes from February:
- Embrace Personalization: Make your emails feel like they’re crafted specifically for each recipient. Address your audience by their names, tailor content based on their past interactions or preferences, and consider dynamic content that adapts to individual interests. Personalization adds a touch of sincerity, increasing engagement and reducing the likelihood of being flagged as spam.
- Avoid Spam Trigger Words: Certain words or phrases can trigger spam filters. Be cautious and avoid using terms like “free,” “urgent,” or excessive punctuation (!!!) that might flag your emails as spam.
- Regularly Update Contact Information: Keep your contact list up to date by removing inactive or bounced email addresses. This practice improves deliverability and ensures your messages reach the right audience.
- Use Double Opt-in: When someone subscribes to your emails, send a confirmation message asking them to verify their subscription. This extra step helps ensure that your recipients genuinely want to receive your emails, reducing the risk of spam complaints.
- Respect Engagement Metrics: Monitor and analyze engagement metrics like open rates, click-through rates, and unsubscribes. Pay attention to what works and what doesn’t, adjusting your email strategy accordingly.
Conclusion
Gmail changes from February might seem scary, but it’s a chance for us to grow and adapt. The new Gmail updates will make things better for users and encourage email senders to be more open and friendly.
So, follow the tips mentioned earlier and you can handle these changes well and become even better at using email in this ever-changing world.
Leave a Reply